2022. 3. 20. 22:09ㆍMachinevision system/Camera
Camera Calibration 이란
카메라의 파라미터 값을 추정하는 과정을 카메라 캘리브레이션이라고 한다.
여기서 파라미터 값이란 Real world(실제 세계)의 3D 점의 좌표와 카메라에 의해 캡쳐된 2D영상에서의 투영된 픽셀간의 관계를 결정하는데 필요한 카메라의 정보를 의미한다.
이때 파라미터는 크게 2가지 종류로 나뉠 수 있다.
- 내부 파라미터(Internel Parameter) : Focal length(초점 거리), optical center(광학 중심) 등이 존재한다.
- 외부 파라미터(Externel Parameter) : world coordinate system에 대한 카메라의 방향을 나타낸다.
OpenCV의 Camera Calibration관련 모듈을 이용하면 내부 파라미터 변수와 외부 파라미터 변수를 찾아낼 수 있다.
import numpy as np
import cv2 as cv
import glob
from google.colab.patches import cv_imshow
먼저 Camera Calibration을 사용하기 위해서 관련 라이브러리를 불러온다.
world coordinate system은 : http://www.vision.caltech.edu/bouguetj/calib_doc/htmls/pattern.pdf 에서 다운받은 Checkboard를 이용한다.
#criteria 기준을 정해준다.
criteria = (cv.TERM_CRITERIA_EPS + cv.TERM_CRITERIA_MAX_ITER,30,0.001)

#object Point를 저장할 배열을 생성한다.
#사용할 world coordinate system의 checkboard의 corner점의 개수 기반으로 정해진다.
objp = np.zeros((6*8,3), np.float32)
objp[:,:2] = np.mgrid[0:8,0:6].T.reshape(-1,2)

objpoints = []
imgpoints = []
#사용할 이미지
images = glob.glob('/content/drive/MyDrive/MachineVision/test*.jpg')
for fname in images:
  img = cv.imread(fname)
  gray = cv.cvtColor(img, cv.COLOR_BGR2GRAY)

  ret, corners = cv.findChessboardCorners(gray,(8,6),None)

  print(ret)
  if ret == True:
    objpoints.append(objp)
    corners2 = cv.cornerSubPix(gray, corners, (11,11),(-1,-1), criteria)
    imgpoints.append(corners)

    cv.drawChessboardCorners(img,(8,6),corners2,ret)
    cv_imshow(img)
ret, mtx, dist, rvecs, tvecs = cv.calibrateCamera(objpoints, imgpoints, gray.shape[::-1],None,None)Camera calibration을 활용해서 내,외부 파라미터를 구할 수 있다.
mtx는 내부 카메라 행렬, rvecs는 rotation vector, tvecs는 translate vector를 의미한다.
이 파라미터들의 정보를 이용해 real world의 3D좌표계가 카메라에 의해 촬영된 2D 좌표로 변환이 될 수 있다.
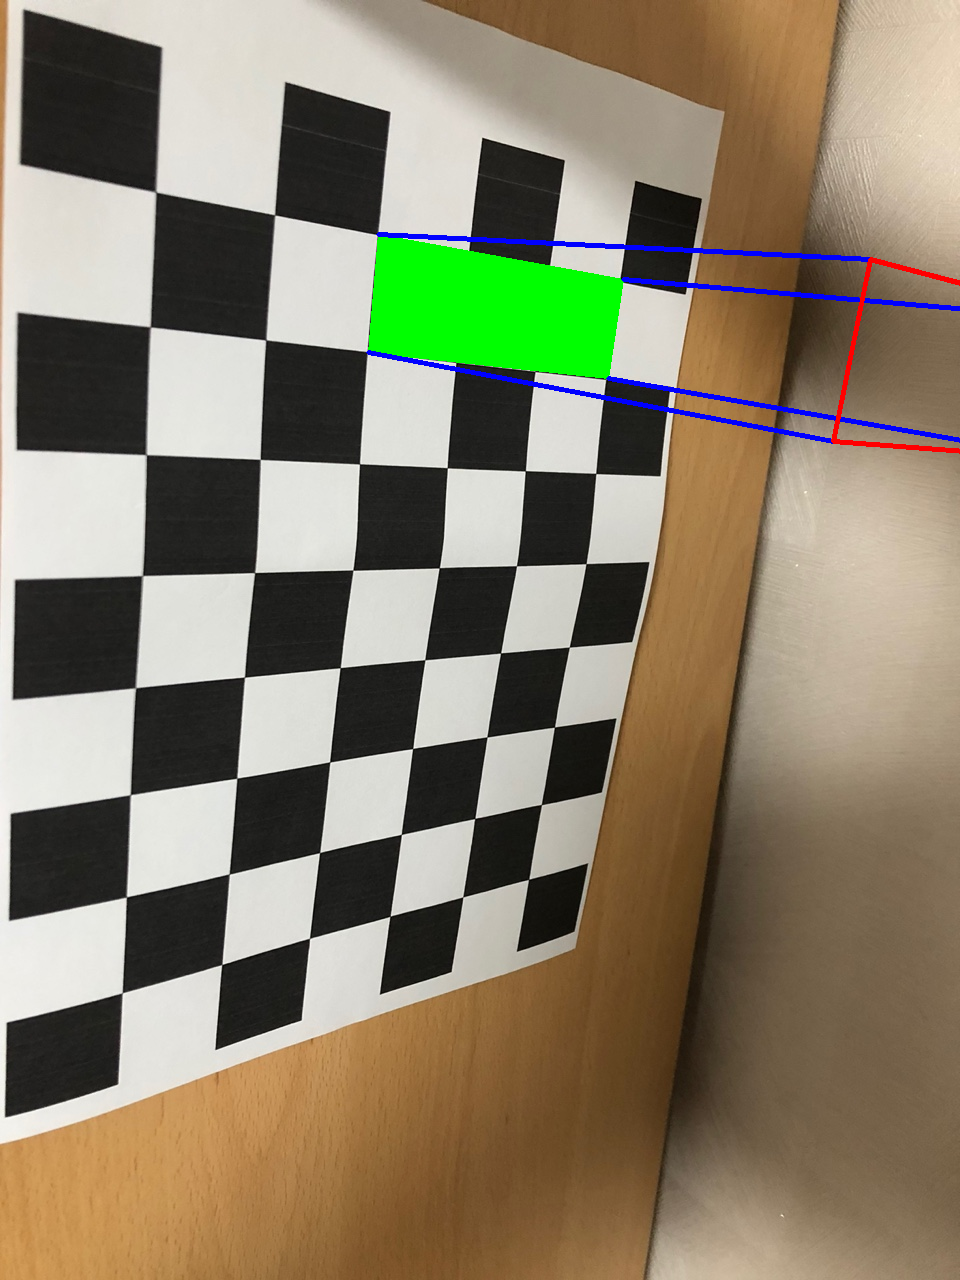
def draw(img, corners, imgpts):
  imgpts = np.int32(imgpts).reshape(-1,2)

  img = cv.drawContours(img, [imgpts[:4]],-1,(0,255,0),-3)

  for i,j in zip(range(4), range(4,8)):
    img = cv.line(img,tuple(imgpts[i]),tuple(imgpts[j]),(255,0,0),3)

  img = cv.drawContours(img,[imgpts[4:]],-1,(0,0,255),3)

  return img
검출된 파라미터 정보들을 이용해서 checkboard위에 3D도형을 투영할 수 있다.
axis = np.float32([[0,0,0],[0,3,0],[1,3,0],[1,0,0],[0,0,-5],[0,3,-5],[1,3,-5],[1,0,-5]])
i = 0

for fname in glob.glob('/content/drive/MyDrive/MachineVision/test*.jpg'):
  img = cv.imread(fname)
  gray = cv.cvtColor(img, cv.COLOR_BGR2GRAY)
  ret , corners = cv.findChessboardCorners(gray,(8,6),None)

  if ret == True:

    imgpts,jac = cv.projectPoints(axis,rvecs[i],tvecs[i],mtx,dist)
    i=i+1
    img = draw(img,corners2,imgpts)
    cv_imshow(img)
가로 길이 1, 세로 길이 3, 높이 5 인 직육면체를 checkerboard (0,0,0)을 기준으로 3D도형을 투영시킨다.
OpenCV의 projectPoints함수를 활용해 이전에 구한 파라미터 정보들을 이용하여 쉽게 투영이 가능하다.