2022. 1. 4. 01:34ㆍcomputervision/섹션 4. MMDetection의 이해와 Faster RCNN 적용 실습

pytorch 기반의 주요 object detection/segmentation 패키지에는 대표적으로 위와 같이 3개의 대표적 패키지가 존재한다. 그중에서도 먼저 MMDetection에 대해 살펴보려한다.
MMDetection은 중국 칭화대학의 주도로 만들어졌다. 2018년 coco challenge에서 우승 후 모듈을 확장하여 다수의 알고리즘을 수용했다. 또한 뛰어난 구현 성능과 효율적인 모델 설계를 특징으로 가지고 있으며, 이 패키지는 Config기반으로 데이터부터 모델 학습, 평가 까지 이어지는 파이프라인을 적용한다.
MMDetection 모델 아키텍처는 다음과 같이 표현될 수 있다.
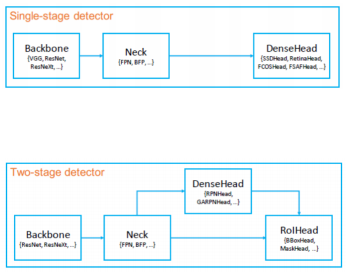
Backbone : 이미지를 feature map형태로 반환
Neck : Backbone과 Heads를 연결하면서 heads가 feature map의 특성을 보다 잘 해석하고 처리할 수 있도록 정제 작업 수행
DenseHead : Feature Map에서 object의 위치와 classification을 처리하는 부분
RoIExtractor : Feature Map에서 ROI 정보를 뽑아내는 부분
ROIHead : ROI정보를 기반으로 Object 위치와 classification을 수행하는 부분
[실습]
MMDetection을 사용하기 위해서는 mmcv 모듈이 필요하다
mmcv 모듈은 https://download.openmmlab.com/mmcv/dist/cu111/torch1.9.0/index.html url에서 다운이 가능하다.
MS-COCO 데이터 기반으로 학습된 Faster RCNN Pretrained 모델을 활용하여 Inference를 수행하기 위해서는
- faster RCNN Pretrained 모델을 다운로드 받기
- faster RCNN용 Config 파일 설정
- Inference 용 모델을 생성하고, Inference를 적용
위와 같은 과정이 필요하다.
성공적으로 pretrained 모델과 config 파일을 다운받았으면 이를 기반으로 Detector 모델을 생성한다.
from mmdet.apis import init_detector, inference_detector

model = init_detector(config_file, checkpoint_file, device='cuda:0')
그 후 학습에 사용될 기존 demo 이미지를 불러온 뒤 detection을 수행해 보았다.

img = '/content/mmdetection/demo/demo.jpg'
results = inference_detector(model, img)
위와 같이 detection의 result의 값을 살펴보면

다음과 같은 결과를 얻을 수 있다. result는 list형으로 coco 클래스의 0부터 79까지의 클래스 id 별로 총 80개의 array를 가진다. 개별의 array들은 총 5개의 좌표값이 존재하는데 [xmin, ymin, xmax, ymax, confidence value]로 구성되어 있다.
mmdection의 show_result_pyplot 모듈을 이용하면 default로 score threshold가 0.3이상인 object들만 시각화가 적용되어 나타나진다.

MMDetection의 video Inference를 수행할때는 mmdection의 video_demo.py대로 video inference 수행시 image 처리 시간이 상대적으로 오래걸린다. 따라서 이미지 처리 로직을 변경하여 적용하면 처리 시간을 상대적으로 단축 할 수 있다.
import cv2

video_reader = mmcv.VideoReader('/content/data/John_Wick_small.mp4')
video_writer = None
fourcc = cv2.VideoWriter_fourcc(*'mp4v')
video_writer = cv2.VideoWriter('/content/data/John_Wick_small_out1.mp4', fourcc, video_reader.fps,(video_reader.width, video_reader.height))

for frame in mmcv.track_iter_progress(video_reader):
  result = inference_detector(model, frame)
  frame = model.show_result(frame, result, score_thr=0.4)

  video_writer.write(frame)

if video_writer:
video_writer.release()def do_detected_video(model, input_path, output_path, score_threshold, do_print=True):
cap = cv2.VideoCapture(input_path)
codec = cv2.VideoWriter_fourcc(*'XVID')
vid_size = (round(cap.get(cv2.CAP_PROP_FRAME_WIDTH)),round(cap.get(cv2.CAP_PROP_FRAME_HEIGHT)))
vid_fps = cap.get(cv2.CAP_PROP_FPS)
vid_writer = cv2.VideoWriter(output_path, codec, vid_fps, vid_size)
frame_cnt = int(cap.get(cv2.CAP_PROP_FRAME_COUNT))
print('총 Frame 갯수:', frame_cnt)
btime = time.time()
while True:
hasFrame, img_frame = cap.read()
if not hasFrame:
print('더 이상 처리할 frame이 없습니다.')
break
stime = time.time()
img_frame = get_detected_img(model, img_frame, score_threshold=score_threshold, is_print=False)
if do_print:
print('frame별 detection 수행 시간:', round(time.time() - stime, 4))
vid_writer.write(img_frame)
# end of while loop
vid_writer.release()
cap.release()위와같이 동일한 수행을 하는 코드로 다시 작성될 수 있다.
위와 같이 image를 detected하는 코드를 mmdection 모듈에서 가져와 사용하지 않고 직접 로직을 구현하여 수행결과 17초가 걸렸다. 조금 더 빠른 결과를 낼 수 있다.
'computervision > 섹션 4. MMDetection의 이해와 Faster RCNN 적용 실습' 카테고리의 다른 글
| mmdetection을 이용한 BCCD 데이터셋 학습 (0) | 2022.01.17 |
|---|---|
| Oxford pet 데이터셋 학습시키기 (0) | 2022.01.11 |
| Config 이해하기 (0) | 2022.01.07 |
| MMDetection의 config형식 (0) | 2022.01.06 |
| MMDetection 적용을 위한 데이터 형식 변환 (0) | 2022.01.06 |