2022. 1. 6. 14:44ㆍcomputervision/섹션 4. MMDetection의 이해와 Faster RCNN 적용 실습
지난번에는 MMDetection의 사용을 위한 kitti tiny dataset변환을 했다. 이번에는 변환된 형식의 kitti tiny dataset을 이용하여 mmdetection에 적용해 보려 한다.
mmdetection은 code형식으로 구현되있지 않고 config형식으로 구현되어 있어 다소 생소하게 다가왔다.
먼저 기존의 config_file과 checkpoint_file을 다운받은 mmdetection파일에서 절대경로로 경로설정을 해준다.
config_file = '/content/mmdetection/configs/faster_rcnn/faster_rcnn_r50_fpn_1x_coco.py'
checkpoint_file = '/content/mmdetection/checkpoints/faster_rcnn_r50_fpn_1x_coco_20200130-047c8118.pth'
from mmdet.apis import set_random_seed
# dataset에 대한 환경 파라미터 수정.
cfg.dataset_type = 'KittyTinyDataset'
cfg.data_root = '/content/kitti_tiny/'
# train, val, test dataset에 대한 type, data_root, ann_file, img_prefix 환경 파라미터 수정.
cfg.data.train.type = 'KittyTinyDataset'
cfg.data.train.data_root = '/content/kitti_tiny/'
cfg.data.train.ann_file = 'train.txt'
cfg.data.train.img_prefix = 'training/image_2'
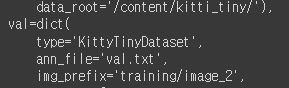
cfg.data.val.type = 'KittyTinyDataset'
cfg.data.val.data_root = '/content/kitti_tiny/'
cfg.data.val.ann_file = 'val.txt'
cfg.data.val.img_prefix = 'training/image_2'
cfg.data.test.type = 'KittyTinyDataset'
cfg.data.test.data_root = '/content/kitti_tiny/'
cfg.data.test.ann_file = 'val.txt'
cfg.data.test.img_prefix = 'training/image_2'
# class의 갯수 수정.
cfg.model.roi_head.bbox_head.num_classes = 4
# pretrained 모델
cfg.load_from = 'checkpoints/faster_rcnn_r50_fpn_1x_coco_20200130-047c8118.pth'
# 학습 weight 파일로 로그를 저장하기 위한 디렉토리 설정.
cfg.work_dir = './tutorial_exps'
# 학습율 변경 환경 파라미터 설정.
cfg.optimizer.lr = 0.02 / 8
cfg.lr_config.warmup = None
cfg.log_config.interval = 10
# config 수행 시마다 policy값이 없어지는 bug로 인하여 설정.
cfg.lr_config.policy = 'step'
# Change the evaluation metric since we use customized dataset.
cfg.evaluation.metric = 'mAP'
# We can set the evaluation interval to reduce the evaluation times
cfg.evaluation.interval = 12
# We can set the checkpoint saving interval to reduce the storage cost
cfg.checkpoint_config.interval = 12
# Set seed thus the results are more reproducible
cfg.seed = 0
set_random_seed(0, deterministic=False)
cfg.gpu_ids = range(1)
# We can initialize the logger for training and have a look
# at the final config used for training
print(f'Config:\n{cfg.pretty_text}')본격적으로 기존의 config파일에 있는 구조를 변환한 kitti tiny dataset의 형태로 변환해주는 코드이다.
이전의 kitti tiny dataset 형태를 바꾸었던 글에서 생성자의 data_root, ann_file, img_prefix의 형식을 config형식을 바꿔주는 이 코드에서 적절한 경로로 바꿔준다.
또한 class 의 개수가 4개로 설정했으므로 config파일의 학습 class개수를 4로 바꾸어 주고 pretrained 모델도 기존의 다운로드 받은 checkpoint 파일로 설정해준다.
config 파일을 열어 설정된 인자들이 재대로 들어갔는지 확인해준다.
config파일의 수정을 완료했으면 형식에 맞게끔 변형된 kitti tiny dataset을 학습시킨다.

학습에 사용된 이미지는 50개로 비교적 학습하기에 적은 데이터이다.
학습된 model을 이용하여 inference를 수행한 결과
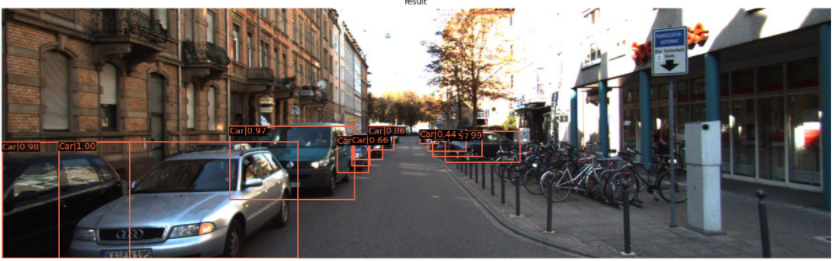
기존 coco dataset에 있던 car나 pedestrain같은 객체는 미리 학습되어 있기 때문에 검출 성능이 좋은 것을 확인했고 새롭게 추가 시킨 cyclist의 검출 성능은 비교적 떨어지는 것을 볼 수 있었다.
이번 강의를 통해서 mmdetection에서 새롭게 학습데이터를 추가해서 mmdetection에서 학습할 수 있는 데이터 형식으로 바꾸어주는 방법을 새롭게 배울 수 있었고 또한 mmdetection에서는 config형식으로 학습을 진행하는데 config형식과 config형식을 변경하는 방법에 대해서도 새롭게 배울 수 있었다.
생소한 코드이지만 여러번 학습해보면서 익혀봐야겠다.
'computervision > 섹션 4. MMDetection의 이해와 Faster RCNN 적용 실습' 카테고리의 다른 글
| mmdetection을 이용한 BCCD 데이터셋 학습 (0) | 2022.01.17 |
|---|---|
| Oxford pet 데이터셋 학습시키기 (0) | 2022.01.11 |
| Config 이해하기 (0) | 2022.01.07 |
| MMDetection 적용을 위한 데이터 형식 변환 (0) | 2022.01.06 |
| MMDetection 살펴보기 (0) | 2022.01.04 |